Ok, so on the previous lesson we discussed the basics and fundamentals of OSPF protocol. On this one, we’re gonna dive deeper into it para mas maintindihan pa natin ito.
Let’s go!
How OSPF Areas are interconnected
Nabanggit nga natin na ang bawat area sa ating OSPF network ay dapat connected sa backbone area which is Area 0. Pero pano nga ba sila nag-kikita kita at inter-connected from each other?
In OSPF, meron tayong iba’t ibang types ng router. They have their own names at may sari-sarili silang functions. Let’s see each of them para mas maunawaan natin si OSPF.
Area Border Router (ABR)

Gaya ng nakikita mo sa sample image natin sa taas, si ABR ay ang router ang nagco-connect from a certain area to a different area. Using the word “border” siguro naman hindi na mahirap intindihin na siya ang nasa border line or pagitan ng magka-ibang area sa ating OSPF network. Think of it like “arko” or boundary ng isang lugar.
Si Area Border Router rin ang responsable sa pag-susummarize ng mga IP address inside it’s area pati na rin ang pag-suppress ng mga updates inside them.
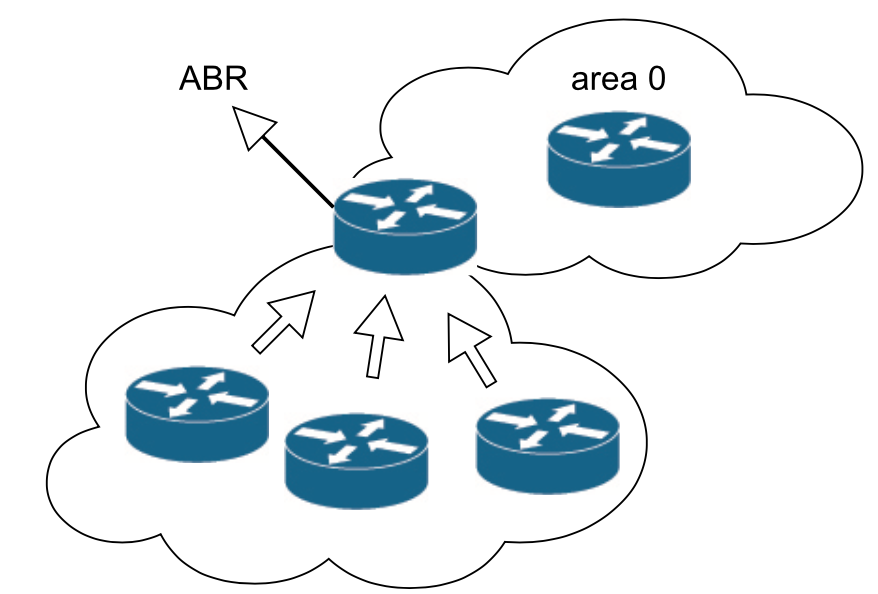
Basically all updates happening inside a certain area ay hindi na tinitingnan ng iba pang mga areas. On configured interval, magpapadala na lamang si ABR ng link-state update sa iba pang mga OSPF router para mag-synchronize ang mga OSPF tables nila. Ganun din sa ibang areas na part ng ating OSPF network.
Autonomous Border Router (ASBR)
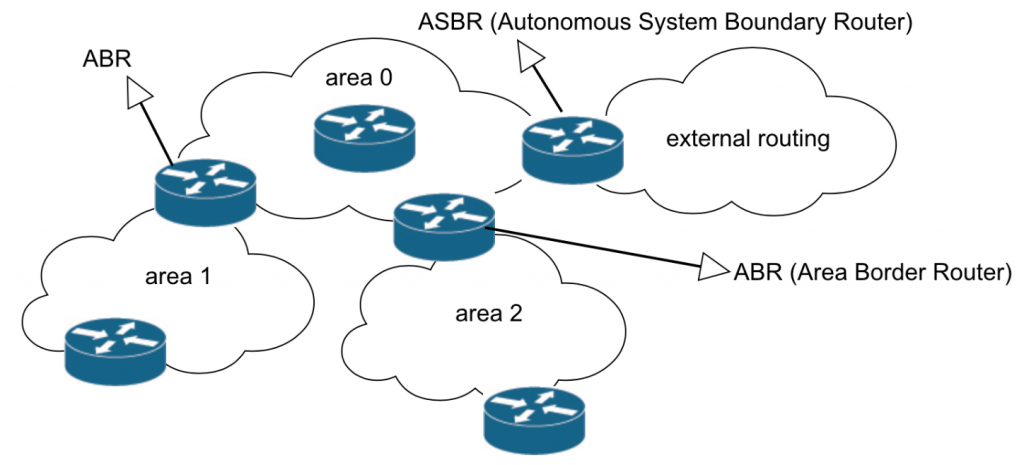
As you can see on the sample image, si ASBR naman ang router na nagco-connect from area 0 to a different network with different AS(autonomous system).
Kadalasan, si ASBR ang nagco-connect kay OSPF network sa ibang routing protocols(RIP, EIGRP etc), ibang organizations or sa external network gaya ng internet. Gaya ni ABR, si ASBR ay may kakayanan din mag-summarize ng network bago ito i-advertise sa kung saan man ito naka-connect na other network.
Internal Router
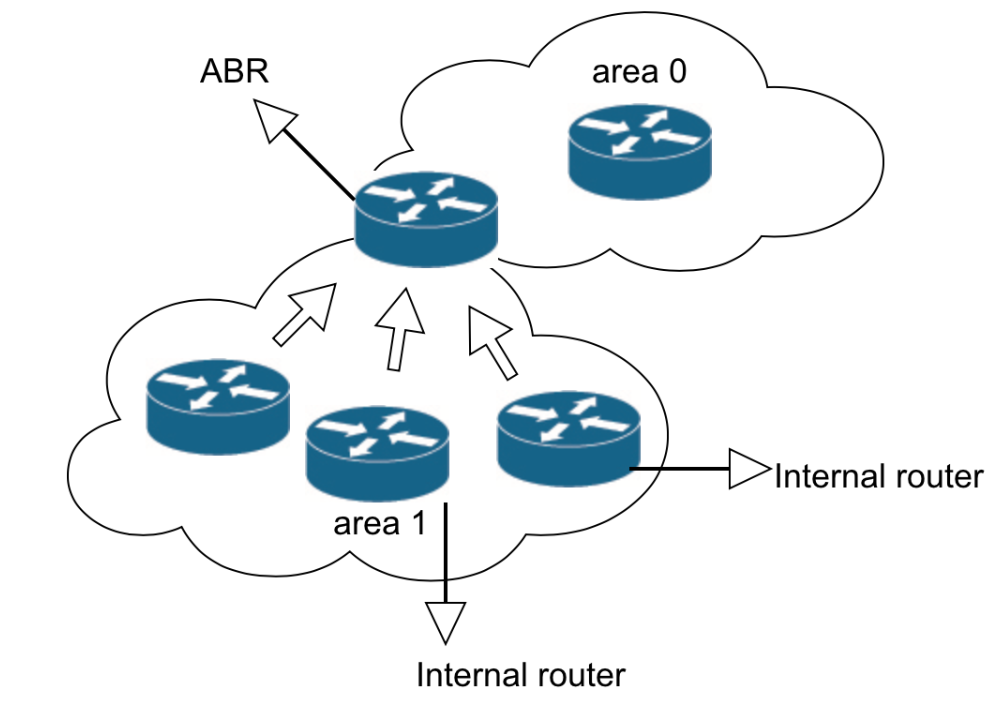
Ang tinatawag naman natin na internal router ay isang common router inside a certain area. Kasi nga in OSPF, there could be internal networks inside of a certain area. For example, as you can see in our sample image above, pwedeng sa loob ni area 1 meron tayong multiple routers.
Yung router na nagco-connect into area 0 is called ABR. Then yung ibang routers inside, internal routers naman ang tawag natin doon.
We’re good?
Now that we understand how areas are connected in OSPF, let’s take another dive into OSPF to know more.
How OSPFR protocol works
In this section, we are going to continue the OSPF and we’re going to take a deeper look on how OSPF protocol works.
Si OSPF protocol ay gumagamit ng Area. Each area are interconnected to the backbone area(Area 0) through the ABR. Then the Area 0 can be connected to external network or other AS using other routing protocol through ASBR naman. I hope malinaw ito mga idol ha.
Let’s dig deeper.
OSPF Neighbor formation
Below are the basic process and stages on how OSPF protocol works and form its neighbor relationship with other OSPF router. Pina-simple ko na lang para mas madali natin maintindihan. I hope makatulong ito upang mas maunawaan niyo pa si OSPF.
Game!
1. After natin ma-configure si OSPF, the first thing na mangyayari is to identify itself via router id. So basically, each router identify each router ID before sending the “OSPF hello message” to the other OSPF router. In a nutshell, ganito muna ang mangyayari:
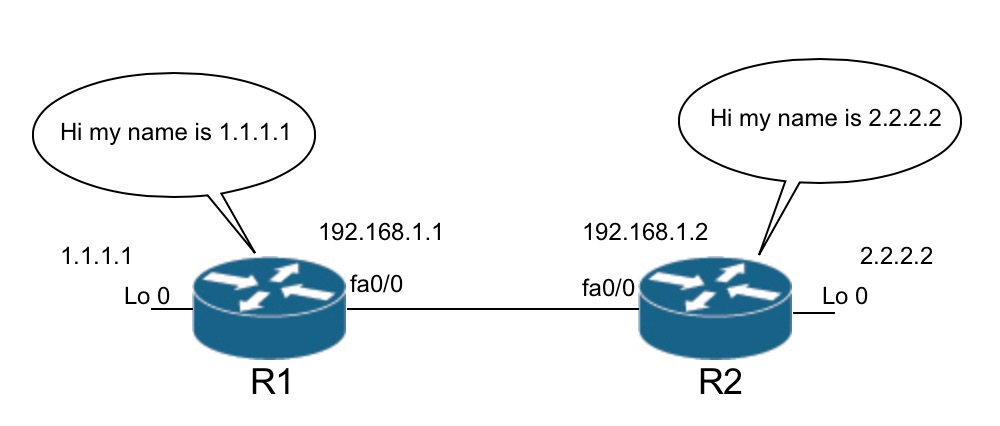
Kagaya ng nakikita niyo sa ating sample image, magpapakilala muna si router sa kanyang neighbor gamit ang kanyang router ID. By default, router ID will be the highest IP address on a physical interface pero loopback interface always wins. Ibig sabihin, kung meron existing na loopback interface, ang pinakamataas na IP address ng loopback ang gagamitin niyang router ID.
Note: We can customize or configure ospf router i.d.
In our case sa taas, kahit na meron tayong existing physical interface at mataas ang IP address nito(192.168.1.1 for R1 & 192.168.1.2 for R2), hindi ito ang magiging router ID kasi meron tayong loopback interface. So ang gagamitin ng mga routers natin ay ang kanilang mga loopback interfaces as their router ID.
In real world, manual ito nilalagay at tayo ang nag-bibigay ng router ID for each device for better management and security purposes. Take note, each router ID must be unique in the entire OSPF network or else magkakaroon tayo ng conflict.
Make sense?
2. After nila magpakilala sa isa’t isa through router ID, ma-aadd ngayon sa link-state database of each router ang interface at ip address ng parehong device by using the “network command“.
Using our example sa taas, bale nangyayari siya when we do network 192.168.1.0 0.0.0.255 area 1 kay R1 at network 192.168.1.0 0.0.0.255 area 1 kay R2 inside the OSPF router configuration given na sila ay parehong nasa area 1. We’ll have that later.
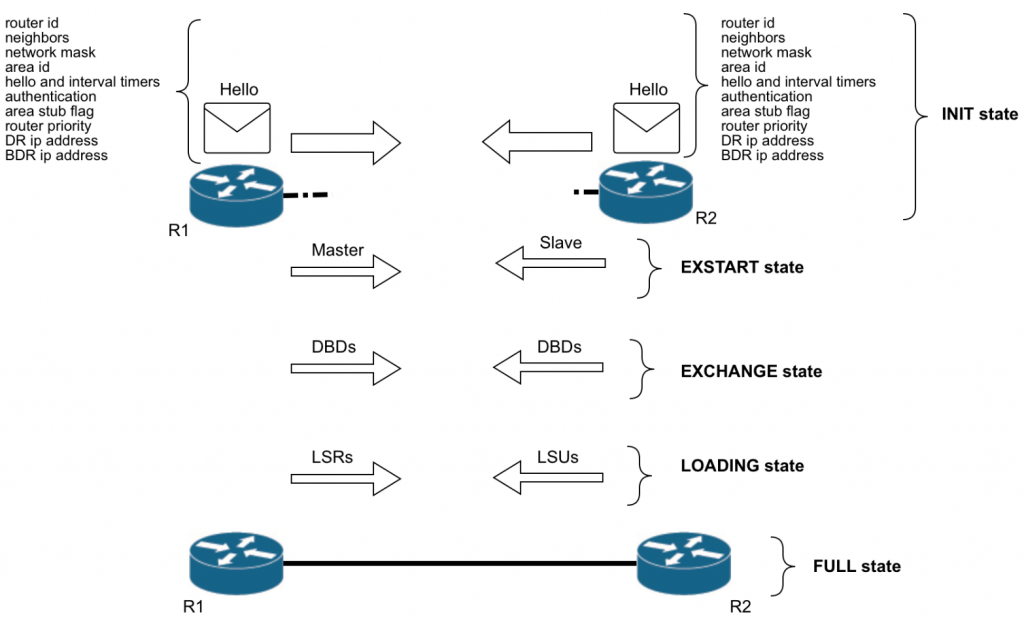
3. After ma-add sa link-state database ang mga ip addresses ng mga interface, this time mag-sesend na ng “OSPF hello” ang bawat router para magpalitan ng routing information. The OSPF hello messages will contain the following information:
- Router ID
- *Hello and Dead timers
- *Network Mask
- *Area ID
- Neighbors
- Router Priority
- DR/BDR IP address
- *Authentication Password
So basically idol, yung hello message ni Router ay naglalaman ng mga yan. Mga information regarding sa naturang router. Yung mga may *asterisk is kelangan tugma or pareho sa kabilang router to form OSPF. Else magkakaroon ng mis-match.
Later titingnan natin meaning nga mga yan pero base sa name nila, I hope you ar getting the idea. It will send the hello every 10 seconds in broadbast or P2P networks then 30 seconds naman sa NBMA(Non-broadcaset multi-access) networks.
4. After that, the neighboring router will receive the hello. Let say si R2 matatanggap niya na ngayon yung OSPF hello message ni R1 containing those information nga na binanggit ko sa taas. I-ccounter check niya ngayon kung pareho sila ng hello and dead timers, network mask, area id at auth password kung meron.
Kung baga gagawin ni R2 sa OSPF hello ni R1: Am I compatible with this router? Check the hello and dead timer(good), check network mask(good), check area id(good) then check auth password(good). Ok, I will form neighbor relationship with this router.
Kapag hindi ito tugma, hindi magfo-form end neighbor relationship nilang dalawa.
Gotcha idol?
I hope naging malinaw.
5. Si R2 or the other side router naman will check kung ang nagse-send sa kanya ng ospf hello message ay new neighbor or an existing neighbor.
Pano niya malalaman?
Siyempre if it exists on its neighbor table. If it’s an existing neighbor, it will reply a hello message then reset the dead timer. Remember na ang existing OSPF neighbor send hello every 10 seconds kung P2P at ethernet networks then 30 seconds naman kng MBA? So its something like a keep alive to check kung buhay pa yung neighbor niya and also for OSPF updates.
Pero kung ito ay new neighbor naman, it will form a neighbor relationship with that router. Given na ung step#4 is compatible ang mga values nila.
6. Next process is the Master – Slave relationship formation.
Ano naman ito?
Basically when routers formed an OSPF relationship, they will also identify master and slave relationship. Si master ang UNANG nagse-send ng OSPF DBD(Database Description) or something like a cliff note summary ng updates regarding sa OSPF network. And si slave naman is magre-reply back lang with its OSPF DBD to check if they have the same DBD.
Basically “master – slave” para lang malaman kung sino unang magse-send ng OSPF DBD with in that OSPF network. Pano ma-identify kung sino ang master at slave? Simple lang idol. By OSPF priority na isine-set natin sa OSPF configuration or by router ID ng isang OSPF router. The higher the router ID will become the master.
7. After ng palitan ng DBDs, siyempre it will be received and acknowledged on both sides of the router. Kung meron updates na missing, that router will send a request for that specific updates (ang tawag dito ay LSR – Link State Request).
Then the other router will send that missing update to the requesting router (ang tawag naman dito ay LSU – Link State Update).
Here’s an example.
R1(master): R2 here’s my OSPF DBDs. Please acknowledge.
R2(slave): Got it R1. It will cross-check ngayon sa kanyang existing OSPF database.
Let say merong new network na na-add kay R1 na wala pa kay R2. R2 now will request for that update. Parang ganito.
R2(slave): Boss R1, I don’t have the info about 192.168.1.0/24. Can you send me the details for that? Ito ang tinatawag na link-state request.
R1(master): Noted R2. Here you go. So ipapadala ngayon ni R1 ung details about sa request ni R2(network, cost, router id at iba pa). Ito naman ang link-state update.
Once it was received by R2, ia-acknowledged niya ito at magse-send siya ng link-state ack just to confirm na natanggap niya na ito.
Gets mo idol?
On this stage, they are comparing their DBDs and then nagpapalitan sila ng updates kung alin ang meron sa kanila at kung alin ang wala.
8. Once both or all routers have synchronized, dito na ico-consider na they are in full state. Ibig sabihin they have all the OSPF information in every routers na member ng OSPF.
This is the time na magru-run na si OSPF ng DIJKSTRA SPF – algorithm para sa mga naturang data or OSPF information. It will now identify the best shortest path from a source to destination and build it’s ospf tables.
Lahat ng steps na na-mention ko sa taas ay part ng different stages ni OSPF. So let’s make a quick summary using the image below.
Alright, I hope by this far mas naintindihan niyo pa how OSPF protocol works. Pina-simple natin para mas maunawaan ng mga bago at aspiring Pinoy CCNA.
By this far, you should now understand kung papaano gumagana at nabubuo si OSPF sa ating network. Dapat alam at naiintindihan mo na rin ano ang mga kailangan para mag-form ng ‘OSPF neighbor relationship’ ang mga routers natin.
All of this are the basics and fundamentals how OSPF protocol works. In the CCNA Master Class, we have each topic explained in details(in video) as well as examples. May mga configurations at sample lab and demo din para talagang mas maintindihan mo.
If you’re interested with CCNA Master Class, send me an email para maisama kita sa VIP waiting list at para una kang ma-inform kapag open na ulit ang enrollment.
For now, you can also take a look at the CCNA Fundamentals Ebook. It has some basics examples din ng OSPF(single area and multiple areas configuration) para mas ma-gets mo pa ang OSPF topic.
You can see the details of the ebook here.
For now, this conclude our topic for OSPF. We are now moving into a new lesson.
Hi sir Billy!
nasan po yung OSPF part 1 po?
pagkiniclick ko po kasi napupunta ako sa CCNA Videos po
thank you sir Billy !
It’s there or check here.
Hi Sir Billy,
Verify ko lang sana dun sa last image nyo for quick summary. Mukhang baliktad ang LSR at LSU. Since R1 Ang master at si R2 ang slave dapat po di ba si R2 ang LSR tas si R1 Ang LSU. Tama po ba?
Thanks!